The Finished Raptor

March 7 raptor

March 7 raptor
This is the raptor as of March 7

Our Raptor in progress

Our Raptor in progress
Half way done! Jan. 28

Blog is Made

Blog is Made
Bryan is making the blog.

The "MAN SAW"

The "MAN SAW"
This is the powerful saw that our class renamed from Ban Saw to MAN SAW

Tuesday, March 29, 2011

Taping the Claws

Since we were not ready to plaster the structure yet, the rest of our class taped up the claws.  We felt that the claws were not sturdy enough to hold the plaster because they were only paper.  We cut and wrapped masking tape around the claws on the hands on feet.


Cutting Out Plaster

Two weeks ago we decided to use plaster instead of paper mache because we thought the plaster would hold up better.  Today, we cut out the strips of plaster.  The strips of plaster were very long so, we cut them into about 1 foot strips.  Then, after we were done finishing cutting, we put them in a box to save for next week because we felt that we would not have enough time to water them and put them on the raptor today.


Thursday, March 24, 2011

Wheels Are Rotated

This week in art, there were only two of us in art so we just fixed up one thing before we plaster the chicken wire.  When we rolled the raptor into the classroom, we felt that the wheels were not smooth.  We saw that the swively wheels were in the back and the wheels that do not swivel were in the front.  We felt that the swively wheels should go in the front so it turns easier.  In effect, the un-drilled the wheels out and drilled them back in the opposite way so that the swively wheels were in the front and the non-swively wheels were in the back.  It seemed alo smoother when it turned.

Monday, March 7, 2011

The Claws

In addition to the repairs, today we also put on the claws.  After the girls finished rolling them up, they taped them onto the chicken wire on the hands.


They also put on the feet claws.

The Repairs

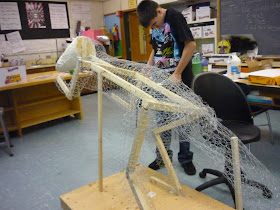
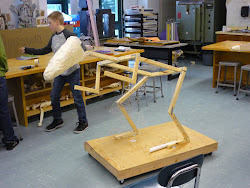
For most of the class-time, we repaired the chicken wire on the body of the raptor.  If there was extra open parts, we covered them.  Also, if we thought parts were too big or too small we cut them or added.  To save our resources, instead of using new rolls of chicken wire, we used the old small scraps.  In fact, most of them were the right size.
The following pictures show most of the repairs we did; including the neck and the bottom of the torso.


Tuesday, March 1, 2011

Using the Band Saw


This is Mr. Dubuque using the band saw to cut the wood.

Chicken Wire on the Neck

We started to put the chicken wire on the neck.  We thought maybe we could use the extra scraps of chicken wire, but we felt that it was too small and it did not work.  So, we took a fresh piece of chicken wire and measured to size.  Then we wrapped it around the wooden neck.


Head goes on

Today, we also connected the head back on to the body.  We had to drill it to the neck.
After we drilled it in, we felt that it was hanging over too much and it looked like it was going to fall.  So, we took another piece of wood.  First, we put it aside the neck-head structure and measured where we would cut it so that it would not be too tall.  Then, we cut it with the band saw.  Finally, we drilled it in to the neck.

Stomach/ Under-torso

Today the class was finishing putting on the putting part of the torso with chicken wire.  This was one of the last steps until the paper maching.  As they tried to attach the chicken wire to the top (back) part of the torso, they ran into a small problem.  They looked at it a couple of times and felt that it was to long.  So, they cut the chicken wire again after measuring it.  Then, they looked at it AGAIN and it was still too long.  So, again they cut the chicken wire.  Finally, it was the right size.